Search Results
79 results found with an empty search
- ProPerla RENOTEC Roof Coating in Southampton
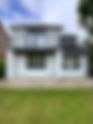
See the Transformation This Southampton case study shows what happens when you take a proactive approach to roof protection using professional roof coating solutions. The property had served its owners well for years, but like many roofs in the South Coast climate, it had begun accumulating algae, moss, and weathering damage. Rather than waiting for structural problems to develop, the homeowners chose to protect their investment with a comprehensive roof coating and cleaning system. The results demonstrate why more people are choosing preventative roof protection as a smart home maintenance decision. If you're considering roof coating in Southampton, this project offers valuable insights into what's possible and why investing in professional treatment makes financial sense over the long term. Project outline: Overview The Challenge The Solution Process Results 1. ProPerla RENOTEC Roof Coating in Southampton Project Overview. Roof protection is about more than aesthetics. Your roof is constantly exposed to rain, wind, UV radiation, and biological growth such as moss and algae. Without proper treatment, these elements can compromise the integrity of your tiles and underlying structures. This Southampton project demonstrates how a comprehensive roof coating approach addresses all these challenges simultaneously. Key Project Details: Location: Southampton, Hampshire Product: ProPerla RENOTEC roof coating Guarantee: 10-year manufacturer's guarantee Services: Professional cleaning, anti-algae treatment, ProPerla RENOTEC application Property Type: Residential home with multi-pitch roof Homeowner Priority: Long-term protection and minimal maintenance 2. The Challenge. When the Southampton homeowners first contacted Veramut, their roof was displaying several problems common to properties in the region. The combination of moisture, shade from nearby trees, and the maritime climate creates ideal conditions for algae and moss growth. What started as cosmetic concerns had gradually become a maintenance headache. The specific issues they faced: Visible moss and algae accumulation across large roof areas Black streaking and discolouration reduce the property's curb appeal Organic growth trapping moisture against tiles, accelerating deterioration Concern that further weathering could lead to leaks and structural damage Annual cleaning requirements are becoming unsustainable in the long term Many homeowners in this situation see only two options: live with the deteriorating appearance or undertake an expensive roof replacement. What the Southampton homeowners didn't initially realise was that modern anti-algae roof treatment technology offers a third option. Professional roof coating solutions in Southampton can protect existing tiles whilst reducing maintenance demands for years to come. The homeowners recognised that this wasn't just a cosmetic problem. Unprotected roofs continue deteriorating faster with each passing season. Investing in protection now would prevent far more expensive repairs later. 3. The Solution. ProPerla RENOTEC represents a significant advancement in roof coating technology. Unlike temporary cleaning solutions that only address the surface, ProPerla RENOTEC creates a protective barrier that continues working for years. Combined with thorough professional cleaning and anti-algae pre-treatment, this system addresses root causes rather than just symptoms. Why ProPerla RENOTEC Roof Coating? Durability: 10-year manufacturer's guarantee ensures long-term protection backed by the supplier Proven Performance: 25 years of independently certified real-world performance data Super-Hydrophobic: Water beads off the surface, preventing moisture penetration and moss adhesion Breathable: Allows the roof to release trapped moisture, preventing rot and degradation underneath UV Protection: Advanced formulation resists fading and maintains protective properties over decades Anti-Algae Formula: Natural properties resist biological growth better than untreated surfaces The anti-algae roof treatment Southampton homeowners received didn't just mean a cleaner roof. It meant a roof that would resist recolonisation by moss and algae far more effectively than the untreated alternative. Combined with the protective coating, the system provided comprehensive, long-term defence against the elements. 4. The Renovation Process. Professional roof coating requires a methodical approach. Applying a coating to a dirty roof would trap moisture and accelerate failure. This Southampton project followed a structured process that ensured optimal results and longevity. Stage One: Assessment and Planning Roof Inspection Comprehensive assessment of tile condition, identifying any damage, loose tiles, or areas requiring repair before treatment Safety Planning Setting up access equipment and protective measures to ensure safe working at height Stage Two: Professional Cleaning Moss and Algae Removal Careful cleaning using pressure and specialist methods to remove years of accumulated biological growth without damaging tiles Debris Clearance Removing leaves, dirt, and loose material from gutters and roof surfaces Surface Preparation Allowing the roof to dry completely before proceeding to chemical treatment stages Stage Three: Anti-Algae Base Treatment Protective Pre-Treatment Application of a specialist anti-algae solution that begins working immediately to prevent new biological growth Coverage Verification Ensuring complete coverage across all roof areas, including valleys and problem zones Drying Period Allowing the base treatment to cure fully before applying the protective coating Stage Four: ProPerla RENOTEC Coating Application Professional Application Experienced technicians applying ProPerla RENOTEC coating at the correct thickness for maximum durability Quality Monitoring Continuous inspection during application to ensure uniform coverage and proper adhesion Curing Time Following the manufacturer's guidelines for drying and curing to develop the protective barrier fully The 10-year guarantee, underpinned by 25 years of real-world performance data, provided the homeowners with genuine peace of mind. 5. Results and Long-Term Benefits. The transformation was remarkable. The Southampton roof went from displaying dark streaking, moss patches, and aged discolouration to presenting a clean, well-protected appearance. But the visible results represent only part of the story. The real benefit lies in what's happening beneath the surface. The homeowners immediately enjoyed: improved curb appeal that instantly elevated the property's appearance, elimination of moss and algae growth, with the anti-algae treatment preventing rapid recolonisation, confidence that moisture is being actively shed away from roof surfaces due to the hydrophobic coating, significantly reduced maintenance requirements going forward, with annual cleaning no longer necessary, 10-year manufacturer's guarantee providing financial protection against coating failure. Looking beyond the immediate period, the homeowners benefit from the 25-year independently certified performance record. Assuming proper maintenance, this roof coating should continue delivering protection well beyond the warranty period. This transforms the investment from a maintenance cost into genuine asset protection. Is Roof Coating in Southampton the Right Solution for Your Property? This Southampton project illustrates why professional roof coating has become such a popular choice among homeowners across Hampshire, Dorset, and beyond. If your roof is accumulating moss or algae, showing signs of weathering, or you simply want to extend the life of your existing tiles, roof coating solutions in Southampton offer a practical, cost-effective alternative to roof replacement. The economics are straightforward. A roof replacement costs thousands and disrupts your home for weeks. A professional anti-algae roof treatment system in Southampton costs a fraction of that whilst extending tile life, improving appearance, and dramatically reducing maintenance demands. For most homeowners, it's an investment that pays dividends almost immediately through reduced upkeep and improved property value. Key advantages of this approach: Cost-Effective Substantially cheaper than roof replacement whilst providing comprehensive protection Long-Term Proven 25 years of real-world performance data backing the coating's effectiveness Guaranteed Protection 10-year manufacturer's guarantee ensures your investment is protected Low Maintenance It reduces the need for regular cleaning and upkeep Improved Appearance Immediately transforms the property's curb appeal and aesthetic value Whether you're located in Southampton, Poole, Bournemouth, or elsewhere across the South Coast, the principles demonstrated in this project remain the same. Professional roof coating creates a protective barrier that continues working for years, whilst the anti-algae treatment prevents the biological growth that causes so much damage to unprotected roofs. If you're ready to protect your roof investment and would like to discuss whether roof coating in Southampton is suitable for your property, contact the Veramut team. With extensive experience in roof protection across Hampshire and Dorset, they can provide expert advice tailored to your specific roof condition and requirements. ——— About Veramut: We specialise in comprehensive exterior renovation services, including professional roof coating, roof cleaning, moss removal, spray cork render, silicone render, and external wall insulation across Bournemouth, Poole, Southampton, Weymouth, Swanage, Dorchester, and surrounding areas. See more of our finished projects.
- Frost-Finish Spray Cork Render in Poole
1. Spray Cork Render in Poole - Project Overview. Most of the homes we work on have a story written into their walls, and this one in Poole was no different. When the owners contacted us in the summer of 2025, the render across their detached property had begun to show cracks that you cannot quite ignore once you have seen them. Fine lines tracked down corners. Hollow patches showed near the balcony columns. The faded blue-grey finish had lost its lustre years before. The owners wanted two things from the project: a render that would not crack again, and a home that held its warmth better through Dorset's wetter, windier months. We brought them spray cork render. By the end of August 2025, the house was wearing a crisp Frost finish, the walls felt noticeably warmer to the touch, and every crack that had nagged the owners for years was gone for good. Here is how the project came together. The project at a glance. Location: Poole, Dorset Project type: Full exterior re-render using spray cork Product: CorkSol SprayCork in Frost Duration: Two weeks across August 2025 Property: Detached two-storey home with a dormer, side balcony and tiled hip roof Reason for the project: Cracked existing render and a desire for better thermal insulation Before we started, the existing render was tired and patchy, with repair work showing through in places. 2. The Challenge. Cracked render is more than a cosmetic problem, and that was the first thing we explained when we visited the property. Once water finds its way behind a rigid render system, the freeze-thaw cycle takes over. Tiny hairline cracks open up over winter. Trapped moisture expands as it freezes. The cracks widen, sometimes invisibly, sometimes very visibly. Left untreated long enough, sections of render can blow off the wall completely, taking chunks of the substrate with them. This particular Poole property had a handful of compounding issues that all needed to be addressed. The original render was rigid and brittle, so any natural movement in the substrate had translated straight into surface cracks. Thermal performance was poor; the owners told us the front rooms felt draughty in autumn, long before the heating bills started climbing. The colour had faded unevenly, with patched repair work clearly showing through The brief was clear. The owners did not want a quick paint job. They wanted a long-term answer. A wall finish that would flex with the building instead of fighting it. A finish that would keep their home warmer through the colder months. And a look that would feel clean, modern and worth the investment for the next two decades. That is a tall order for traditional render, but it is exactly what spray cork is built for. 3. The Solution. For anyone who has not come across it before, spray cork is a sprayed-on render made from natural cork granules suspended in a flexible water-based binder. It is the same material you will have seen in wine bottles and noticeboards, only engineered for the outside of your house. We have been applying spray cork render across Dorset for years, and it remains one of the most quietly impressive products in the rendering industry. For this Poole property, it ticked every box on the brief: It bridges cracks instead of cracking itself Spray cork stays flexible once cured, so when the building moves with temperature changes and natural settlement, the render moves with it. That is the single biggest reason cracked render keeps coming back when homeowners replace like for like; the new system ends up just as rigid as the old one. It improves thermal insulation Cork is a natural insulator. A spray cork render coat will not replace external wall insulation in pure thermal terms, but it noticeably reduces heat loss through the wall surface and helps cut condensation on cold spots inside the home. It is breathable. Trapped moisture in walls is one of the silent killers of British homes. Spray cork lets the wall breathe rather than sealing damp inside. It is low maintenance No repainting every few years. No algae streaks. No fading. A quick wash down once in a while is genuinely all it asks of you. The colour range is excellent. CorkSol offers around 25 standard colours. The owners chose Frost, a bright, soft off-white that catches the Dorset light beautifully without being a glaring, brilliant white that would look out of place in a residential street. Once the owners had seen samples in person and visited a couple of nearby case studies, the decision was straightforward. 4. The Renovation Process. We are often asked how long spray cork rendering in Poole can take from start to finish. For a property of this size, two weeks is a typical timeframe, weather permitting. Here is how this project unfolded: Survey and preparation. Before spray cork was applied to the wall, we walked the property with the owners, identified the worst areas of cracking, and agreed on the final colour choice. We also confirmed access for our tower scaffolding around the side return and the front elevation. Scaffolding and masking. Once on site, the Veramut team set up the tower scaffold and started the meticulous job of masking. Every window, door, sill, balcony rail, downpipe, and roof edge was wrapped or taped. This is the unglamorous half of a spray cork project, but it is the part that separates a tidy job from a messy one. Substrate preparation. Loose render was cut out, hollow patches were chased back, and the existing surface was thoroughly cleaned. Where the original render had blown, we made good with a compatible base coat and let it cure properly before going any further. Priming. A specialist primer was applied across the entire wall area. This step is not optional. It locks the substrate down, evens out absorbency, and gives the spray cork something reliable to bond to. Spray cork application. The colour for this project, Frost, was applied at this stage, so no further painting is required. The colour is built into the product itself, which is part of why spray cork is so low maintenance over the years. The finish already looks beautiful at this point, but we never sign off on anything until we are completely happy with it. De-masking, snagging and clean-up. Every piece of masking came off carefully. Edges were checked, any minor blemishes touched in by hand, and the whole site was cleaned down. The owners came home to a finished house, not a building site. The August timing helped. Warm, dry weather is ideal for spray cork application, and Dorset gave us a kind run during those two weeks on site. 5. Spray Cork Render in Poole. Summary. For anyone weighing up cork render in Dorset as an option for their own home, here is what this spray cork render in Poole project delivered in a nutshell: A crack-resistant, flexible exterior that will not repeat the original problem Improved thermal performance through the natural insulating properties of cork A clean, bright Frost finish that has transformed the kerb appeal of the property A breathable wall system that helps the building manage moisture properly A finish that should still look this good in 25 years with virtually no maintenance A full project completed in two weeks, with the family back to normal life by the end of August Cracked render is one of the most common problems we see on Dorset homes, and it is rarely just about how a house looks from the road. Behind every crack is a wall that is losing heat, gathering damp, and slowly degrading. The Poole project we have just walked you through is a textbook example of how spray cork render in Poole can solve all three issues in a single fortnight on site. If your own home is showing the same warning signs, whether that is hairline cracks, cold rooms, or render patches that no longer match, we would be happy to come and take a look. A free survey gives you an honest assessment of whether spray cork is right for your property, which colour might suit, and what timeline and budget to expect. Get in touch with Veramut today, and we will talk through your options. No pressure, no jargon, just a proper conversation about what your walls actually need. Project Gallery
- Spray Cork Render Southampton
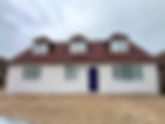
Two Weeks to a Stunning Modern Exterior When a homeowner in Southampton decided it was time to breathe new life into their property's exterior, they discovered the transformative power of spray cork render. What once was an aged, stained façade has now become a modern, fresh-looking home that stands out for all the right reasons. This case study explores why Spray Cork Render has become such a popular choice for homeowners looking to renovate their render without compromising on durability or aesthetic appeal. The decision to upgrade a property's exterior finish is significant. It's an investment in your home's future, and it directly impacts first impressions, property value, and the ongoing enjoyment of your living space. Across Dorset, Hampshire, and the wider South Coast, homeowners are increasingly turning to spray cork solutions as an alternative to traditional render renovation methods. This case study illustrates exactly why this approach delivers such impressive results. Spray Cork Render in Southampton - Project Overview When we talk about exterior render renovation, the stakes are high. Your home's external finish protects the building envelope, affects the property's visual impact, and influences how potential buyers or visitors perceive your space. This project in Southampton demonstrates why spray-cork render has become the go-to solution for homeowners looking to upgrade their property. Key Project Details: Location: Southampton, Hampshire Product: SprayCork Render in Arctic White Project Duration: Two weeks Property Type: Residential bungalow Motivation: Renovation of existing render and desire for the benefits of spray cork The Challenge Before the transformation, the property presented a common problem that many homeowners in Southampton and across Hampshire face. The existing property render had begun to show its age, staining, algae growth, and discolouration had accumulated over the years, giving the property a tired, unmaintained appearance despite the homeowners' best efforts. The specific challenges included: Visible algae staining and dark marks across the render surface Weathering and wear from years of exposure to the elements Aesthetic concerns, the property no longer reflected the homeowners' pride in their home Maintenance burden, regular cleaning required to manage algae and discolouration Many homeowners in this situation consider a full render replacement. However, this can be expensive and disruptive. The decision to investigate spray cork render solutions opened up a more practical, cost-effective alternative that would address all these concerns whilst delivering superior long-term performance. Rather than accepting decades of declining aesthetics and rising maintenance costs, the homeowners recognised the opportunity to upgrade to a modern, sustainable finish that would look better and require significantly less upkeep. The Solution Spray Cork Render in Hampshire has rapidly become the preferred choice for homeowners looking to renovate their exterior walls. Unlike traditional silicone render, which can accumulate biological growth and staining, spray cork offers a fundamentally different approach to external finishes. Spray Cork Render Southampton installations provide multiple advantages that make it the ideal solution for this property. Why Spray Cork Render? Durability SprayCork render is designed to withstand coastal and urban environments, resisting the elements far better than aged silicone finishes Low Maintenance The natural cork composition resists algae and biological growth, reducing long-term maintenance demands and cleaning requirements Aesthetic Appeal Available in multiple finishes, Arctic White was chosen for its modern, clean appearance that complements contemporary property designs Thermal Performance Cork is a natural insulator, potentially improving the property's energy efficiency and reducing heating costs Environmental Benefits Cork is a renewable, sustainable material harvested from cork oak trees without harming the ecosystem The choice of Arctic White colour was deliberate. This finish provides a contemporary aesthetic while masking any future minor weathering, ensuring the property maintains its fresh appearance for years to come. Unlike lighter finishes that can show every mark, Arctic White balances modern appeal with practical maintenance considerations. Spray Cork Render in Southampton - The Renovation Process Exterior render renovation requires careful planning, precise execution, and attention to detail. The team at Veramut managed this Southampton project with a systematic approach that minimised disruption whilst delivering exceptional results. Here's how the two-week project unfolded: Site Assessment. Initial inspection of the existing render condition, identifying any structural issues or areas requiring repair before application Surface Preparation. The existing render was carefully cleaned and prepared to receive the new SprayCork application, ensuring optimal adhesion Protective Measures. Protection of windows, landscaping, and adjacent surfaces from spray to maintain the property and surroundings Priming. Application of a suitable primer to ensure proper adhesion of the new render system and durability over time SprayCork Application. Professional spray application of Arctic White SprayCork render, building up to the specified thickness for durability Quality Checks. Continuous inspection during application to ensure consistent coverage and finish across all surfaces Curing. Allowing proper drying time in accordance with the manufacturer's specifications to develop full strength Final Details. Cleaning, removal of protection, and thorough inspection to ensure the finish meets expectations The two-week timeline was achievable because of the efficiency of spray application methods. Unlike traditional render applications, which require hand trowelling and multiple passes, spray cork render can be applied quickly and uniformly. This approach means less time on site, less disruption, and faster project completion compared to conventional renovation methods. Results and Homeowner Satisfaction The transformation speaks for itself. What was once a weathered, discoloured exterior is now a bright, modern-looking property that commands attention for all the right reasons. The Arctic White finish provides a contemporary aesthetic that elevates the entire property, improving curb appeal and likely adding measurable value. The homeowners were very happy with the result and are thoroughly satisfied with their decision to upgrade to Spray Cork Render Southampton. The property now benefits from: a clean, fresh-looking exterior that they're proud to show off to family and friends, significantly reduced maintenance requirements going forward, freeing time and money for other priorities, improved thermal performance from the cork's natural insulating properties, potentially reducing energy bills, peace of mind knowing they've chosen a durable, long-lasting finish backed by proven performance. Is SprayCork Render Right for Your Home? This project in Southampton demonstrates why spray cork render has become such a popular choice among homeowners in Hampshire, Dorset, Poole, and beyond. If your property's render is showing signs of age, staining, or weathering, and you're looking for an exterior render renovation solution that combines aesthetics with durability, SprayCork Render could be exactly what you're looking for. The key advantages that made this project successful are still relevant today: Speed Spray application means your project is completed in weeks, not months, minimising disruption Quality Professional application ensures a flawless, uniform finish with consistent coverage Value Long-term durability and low maintenance mean excellent return on investment over time Aesthetics Available in multiple colours, Arctic White is just one stunning option for modern properties Whether you're located in Southampton, Poole, Bournemouth, Weymouth, or elsewhere in Hampshire and Dorset, the principles demonstrated in this case study remain the same. Spray Cork Render installations transform properties by combining modern aesthetics with proven long-term performance. The investment pays dividends through reduced maintenance costs, improved curb appeal, and the satisfaction of owning an exterior finish that looks as good as it performs. If you're ready to transform your home's exterior and would like to discuss whether spray cork render is the right solution for your property, get in touch with your local rendering specialist team at Veramut. With years of experience in exterior renovation across the South Coast, we can provide expert advice tailored to your specific needs and circumstances.
- Thermal Render Property Renovation in Poole
1. Thermal Render Property Renovation in Poole. Project Overview. At Veramut Ltd, we love helping homeowners transform their properties with beautiful and practical exterior finishes. Recently, we completed a project in Poole, Dorset, where spray cork thermal render completely revitalised a home. The client wanted to improve the property’s look while tackling crumbling bricks, and our thermal-insulating render solution delivered both. Our approach is always centred on understanding the unique demands of each building and environment, then suggesting the most suitable solutions, such as the thermal spray cork render system, to meet those needs. This Poole project was a perfect demonstration of that philosophy in action, combining superior thermal efficiency with unparalleled aesthetic results after foundational substrate stabilisation. Location: Poole, Dorset Duration:2 weeks Materials: base coat and spray cork thermal render in a soft Cotton colour Client Goals: The homeowners wanted a property that looked fresh, modern, and well-maintained. Their main concern was crumbling bricks and old render that no longer protected the walls. They also wanted a finish that complemented their home’s style. 2. The Challenge. Every property exterior renovation starts with a problem to solve, and it was no different this time in Poole. The parameters for this exterior renovation were well-defined from our initial consultation, allowing us to plan an efficient thermal render application focused on structural enhancement. The property’s exterior was showing significant wear, with crumbling bricks throughout the walls. The damaged brickwork not only affected the home’s appearance but also compromised its structural stability and thermal performance, allowing heat to escape more easily. The client wanted a solution that would restore the integrity of the walls while giving the property a fresh, modern look. They chose a soft Cotton coloured spray cork thermal render for its aesthetic appeal and insulating properties. Completing the work efficiently within the two-week window while ensuring a durable and visually striking finish required careful planning and expert application. 3. The Solution. Spray cork thermal render was the solution of choice. This material is excellent for homeowners looking for thermal-insulating render that enhances both appearance and energy efficiency. Cork naturally insulates, while the silicone spray provides water resistance, durability, and a textured finish. By combining insulation with high-quality spray cork, the walls became more energy-efficient, protected from the elements, and visually stunning. The chosen colour and texture created a modern, timeless exterior that complemented the property perfectly. Why Choose a Thermal-Insulating Render? The decision to install a system focused on thermal render was a long-term investment in the property's structural health, efficiency, and longevity. The combination of modern materials delivers multiple critical benefits that traditional finishes simply cannot match. Energy Efficiency and Cost Savings The primary appeal of this system is its ability to significantly improve the wall's U-value (a measure of heat transfer). By adding a dedicated layer of insulation render, the client immediately benefits from reduced reliance on central heating, translating into lower utility bills. This insulation effectively slows heat transfer, keeping the home warmer in winter and cooler in summer. Weather Resistance, Durability, and Flexibility Modern silicone-enhanced renders are formulated to be highly flexible, which is crucial for longevity. Unlike old, rigid cement renders that crack easily when the building naturally expands, contracts, or settles, the elasticity of our thermal-insulating render system allows it to accommodate minor structural movement without fracturing. Furthermore, these renders are highly hydrophobic (meaning they repel water), protecting the newly stabilised wall from rain and moisture ingress, making the system incredibly durable against the harsh coastal elements. Aesthetic Freedom and Breathability The high-quality finish, applied in the client's desired custom colour, delivers a sophisticated aesthetic transformation. Crucially, while repelling external rain, the materials remain highly vapour-permeable, often referred to as breathable. This allows internal moisture vapour (from cooking, showering, etc.) to escape harmlessly through the wall structure. This is vital for preventing the buildup of damp, reducing the risk of condensation and mould inside the home, and safeguarding the long-term health of both the building and its occupants. 4. The Renovation Process. Surface Preparation We began by carefully preparing the brickwork, removing any loose debris and ensuring the walls were clean and stable. Proper surface preparation is essential for adhesion and longevity of the thermal render. Base Coat Application Once the bricks were stabilised, we applied a high-quality base coat. This creates a strong, even foundation for the spray cork render, helping to secure the insulation layer and ensuring a smooth, durable finish. Spray Cork Thermal Render Application Finally, we applied a single, even layer of silicone spray cork render in cotton colour. This layer provides a protective, weather-resistant exterior with excellent thermal-insulating properties. The cork finish adds depth and character, giving the property a fresh, revitalised appearance while improving energy efficiency. 5. Thermal Render Property Renovation in Poole. Summary. The Poole renovation perfectly demonstrates how thermal render can transform a home. By addressing both structural and aesthetic challenges, our rendering specialists delivered an external wall finish that is beautiful, durable, and energy-efficient. Spray cork thermal-insulating render not only protects walls but also enhances insulation and overall comfort. If this project has inspired you, it’s the perfect time to improve your property’s exterior. Get in touch with Veramut Ltd for a tailored quote. Our team can help you choose the best thermal render solution and bring your vision to life. Project Gallery
- CorkSol Spray Rendering in Poole
1. Spray Rendering in Poole - Project Overview. At Veramut, we pride ourselves on delivering top-quality rendering solutions that enhance a property's aesthetics, durability, and functionality. This case study focuses on a significant project we undertook in Poole over the summer of 2024, which involved exterior property rendering and roof renovation. Today, we dive into the exterior rendering aspect of the project. The owner, seeking to enhance its appearance, durability, and protection, turned to Veramut, a renowned specialist rendering company. The ambitious project involved a comprehensive exterior rendering using CorkSol in Arctic White, a material renowned for its exceptional performance and aesthetic appeal. Location: Poole, UK Client: Private homeowner Project Duration, one phase - rendering: 2 weeks Materials Used: CorkSol in Arctic White Spray Rendering Project in Poole. Case Study Outline:Project Overview. The Challenge. The Solution. The Renovation Process. Summary. 2. The Challenge. The Poole property faced several significant challenges that necessitated a specialised exterior rendering solution: Severe cracking The existing exterior was riddled with cracks, exposing the underlying structure to moisture, temperature fluctuations, and other environmental factors. These cracks compromised the property's appearance and created potential structural vulnerabilities. Deteriorating exterior The property's exterior showed wear and tear, including peeling paint, fading colours, and surface erosion. This deterioration affected the property's aesthetic appeal and compromised its ability to withstand the elements. Uniformity The owner desired a cohesive and visually appealing exterior to enhance the property's overall curb appeal. The exterior lacked uniformity, with varying textures, colours, and finishes. Limited maintenance The owner sought a rendering material that would require minimal ongoing maintenance. Traditional rendering materials often necessitate regular repairs, repainting, or sealing, which can be time-consuming and costly. Environmental concerns The owner was also mindful of environmental factors and sought a sustainable rendering solution to minimise the property's ecological footprint. 3. The Solution. Veramut's team of experienced professionals carefully assessed the property's challenges and devised a tailored solution using CorkSol. This innovative rendering material offers several key benefits that address the project's specific needs. Superior durability CorkSol is renowned for its exceptional durability, making it ideal for properties facing severe cracking and deterioration. The material's resilience ensures long-lasting protection against environmental factors and minimises the need for future repairs. It comes with a 25-year guarantee. Enhanced weather resistance CorkSol is highly resistant to moisture, temperature fluctuations, and other weather-related elements. This ensures the property remains protected from rain, wind, frost, and UV rays, preventing further damage and preserving its structural integrity. Exceptional flexibility CorkSol's flexibility allows it to accommodate minor movements in the underlying structure, reducing the risk of cracking and ensuring a durable and long-lasting finish. Low maintenance CorkSol requires minimal ongoing maintenance, making it a practical and cost-effective choice for property owners. The material's durability and resistance to weathering mean it retains its appearance and functionality for many years without requiring frequent repairs or repainting. Sustainability CorkSol is a sustainable and environmentally friendly material. It is derived from renewable cork oak trees, harvested without harming the trees themselves. Additionally, CorkSol is recyclable, reducing its environmental impact. Aesthetics Beyond its functional benefits, CorkSol also offers a visually appealing finish. The Arctic White colour chosen for the project creates a clean, modern look that enhances the property's overall aesthetic and curb appeal. Uniformity CorkSol's smooth and even application ensures a consistent and uniform finish across the entire exterior, creating a cohesive and visually pleasing appearance. 3. The Renovation Process. The renovation process for this project required a meticulous and detailed approach to ensure both structural durability and a flawless aesthetic finish. We began by thoroughly inspecting the property and identifying key problem areas such as cracks, uneven surfaces, and old ventilation holes that were no longer used. These issues needed immediate attention to prevent future damage and ensure the longevity of the new render. Our team repaired the cracks by cleaning, opening, and filling them with flexible, durable materials that would withstand temperature changes without compromising the render’s integrity. Next, we focused on smoothing the uneven surfaces of the walls, ensuring a uniform and level foundation for the CorkSol application. We also sealed the old ventilation holes, eliminating drafts and improving the overall weatherproofing of the property. Once the surfaces were prepped, we cleaned the walls thoroughly to remove dirt, moss, and old paint, ensuring optimal adhesion for the CorkSol. The next step was to apply the CorkSol spray cork render in Arctic White, which bonded seamlessly to the prepared surfaces, offering excellent coverage and long-term durability. We painted over the exposed brick features at the homeowner's request to create a uniform look that complemented the fresh Arctic White exterior. After applying the final layers and ensuring even colour and texture throughout, we conducted a thorough quality inspection. The CorkSol’s flexibility ensured the exterior would be protected from future cracks and weather damage while maintaining breathability to prevent condensation buildup within the walls. By the end of this project phase, the property had been completely transformed into a weatherproof, crack-free, and visually appealing home with a sleek, uniform finish. 4. Spray Rendering in Poole. Summary. The CorkSol spray rendering project in Poole was a successful transformation. Veramut's expertise and CorkSol's exceptional qualities transformed the property's exterior, creating a stunning and durable finish. The owner's crack prevention, weatherproofing, protection, and aesthetic appeal goals were fully realised. Stay tuned to our Facebook page for an upcoming case study on the roof renovation aspect of this project. Are you ready to transform your property's exterior? Let Veramut's expert spray rendering services elevate your home or business. Our team specialises in creating stunning, durable, weatherproof finishes using high-quality materials like CorkSol. We offer tailored solutions to your needs, from crack repair to complete exterior renovations. Contact us today for a free quote and discover the difference Veramut can make. Project Gallery
- Insulation & Rendering Upgrade in Bighton
1. Insulation and Rendering Upgrade. Project Overview. We were approached to transform a Bighton home that had been struggling with extensive cracking in its exterior render and poor thermal performance. The homeowners wanted a solution that would refresh the property’s appearance and provide lasting comfort and energy efficiency. To achieve this, we implemented a comprehensive insulation and rendering system, starting with 50mm insulation boards, followed by a fibre-reinforced basecoat, and finishing with a premium CorkSol spray cork render in Arctic colour. The result was a durable, modern and sustainable exterior that strengthened the walls, improved thermal retention, and gave the property a clean, polished look. This property renovation centred on improving the exterior walls through a combination of insulation work and a high-performance rendering finish. Duration: 3 weeks Completion year: 2022 Materials: 50mm external insulation boards, fibre-reinforced basecoat, and spray cork thermal render in Arctic White colour Client goals: a more flexible, more thermally efficient exterior. 2. The Challenge Widespread Cracking to Existing Render The old render had cracked extensively, leaving the walls vulnerable to moisture and creating an uneven, tired appearance. Lack of Thermal Comfort Cold spots and heat loss were becoming increasingly noticeable inside the home. The client wanted a solution that improved comfort without invasive internal work. The owners needed a solution for insulation and rendering that would breathe new life into the building while keeping the heat where it belongs: inside. 3. The Solution To tackle the issues described above, we proposed a multi-layered system: High-performance 50mm insulation boards to create a thermal envelope. Fibre mesh reinforcement to ensure the new surface would never crack like the old one. CorkSol Spray Cork render in the shade "Arctic" for a sustainable, flexible, and breathable finish. Why did we opt for spray-cork rather than traditional render? Spray cork is naturally breathable and flexible. Unlike traditional property render solutions, it doesn't crack when the building moves or the temperature shifts. It also provides an extra layer of acoustic and thermal insulation. Also, it works extremely well as a flexible, crack-resistant final coat. 3. Insulation and Rendering Upgrade in Bighton - The Process As always, when embarking on a property renovation project, we followed a preparation and installation process to ensure the finish would last for decades. The process was as follows: 1. Wall Preparation Proper preparation is essential for any insulation and rendering project. So, we started by removing all cracked render, then cleaned down the substrate and applied primer to improve adhesion. 2. Insulation Boards Installation We fitted 50mm insulation boards to create a strong, level and energy-efficient base. 3. Basecoat & Mesh Reinforcement Application We applied a reinforced basecoat with embedded fibre mesh to stabilise the surface and ensure a long-lasting result. 4. Spray Cork Rendering Installation The final stage involved applying the spray cork finish, transforming the home’s exterior with a fresh Arctic colour and a flexible surface. 4. Insulation and Rendering Upgrade in Bighton, Hampshire. Summary. In just three weeks, the Bighton property went from a high-maintenance, chilly house to a modern, energy-efficient home. By combining insulation and rendering, we addressed the root cause of the cracking while improving the home's "U-value" (its ability to retain heat). The Arctic finish gave the home a bright, clean look that perfectly suits the Hampshire countryside. Upgrade Your Walls with Insulation and Rendering If your home is struggling with cracked render, poor insulation, or tired-looking walls, a professional insulation and rendering solution can transform both its appearance and comfort. Get in touch with our team today to discuss how we can protect, enhance, and modernise your property with a durable, energy-efficient finish. Project Gallery
- Lime Render & Spray Cork in New Milton
1. Lime Render and Spray Cork in New Milton Project Overview. If you own a brick property, you’ll know what a thankless job brick pointing can be. Repointing takes time, costs money, and never really feels like a permanent fix. For one homeowner in New Milton, Hampshire, it had become an ongoing frustration they simply didn’t want to deal with anymore. They also wanted something more from their home’s exterior: proper thermal insulation that would make a real difference to how warm and comfortable the property felt from the inside. That's why we have been contacted. Over the course of two weeks, we applied a full exterior rendering system combining a breathable lime render base coat with CorkSol spray cork in the colour Frost (widely regarded as the most breathable rendering system on the market). The result? A beautifully finished, thermally improved home that will not need re-pointing ever again. This case study walks you through exactly what was involved, from the initial challenge right through to the finished result, so you can understand whether a similar approach might be the right solution for your own property. This was a detached single-storey bungalow in New Milton, Hampshire. Typical of many properties in the area, the building was constructed of red brick, which had served it well structurally but had begun to pose ongoing maintenance challenges for the homeowner. At a glance, here’s what the project involved: Location: New Milton, Hampshire Property type: Detached bungalow (brick construction) Duration: Two weeks Base coat: Lime render (applied by Veramut Ltd) Top coat: CorkSol SprayCork in Frost System type: Breathable lime render base and spray cork system Primary goals: Eliminate brick pointing maintenance and improve thermal insulation 2. The Challenge. Like many brick bungalows across Hampshire and the surrounding area, this property had been showing its age. The mortar joints between the bricks were deteriorating, and the homeowner had already spent time and money on pointing repairs over the years. It was one of those jobs that keeps coming back. The frustration was completely understandable. Brick pointing on a whole property is labour-intensive work, and even when it’s done well, it isn’t a permanent solution. Mortar will continue to erode over time, particularly on south- and west-facing elevations that are exposed to driving rain and temperature fluctuations. In Hampshire, where winters can be damp, and the wind off the south-west coast picks up, exterior wall maintenance like this can feel like a never-ending cycle. On top of that, the homeowner had another concern: thermal performance. The brick walls, while solid, weren’t doing much to retain heat. The property felt cooler than it should in winter, and they wanted a solution that would genuinely improve the warmth inside (not just patch up the outside). So the brief was clear: find a rendering system that would permanently protect the walls, require minimal upkeep going forward, and actually make the home noticeably warmer. 3. The Solution: Lime Render and Spray Cork with CorkSol. After assessing the property, we recommended a two-stage system that we felt was the ideal match for this particular build and the homeowner’s goals: a lime render base coat followed by CorkSol SprayCork as the finishing layer. Together, these two products form one of the most breathable, durable, and thermally effective exterior rendering systems available today. Why Lime Render as the Base? Lime render has been used in construction for centuries, and for good reason. It’s a naturally breathable material, which means moisture within the wall can escape rather than becoming trapped behind an impermeable coating. For a brick bungalow that has weathered for years, a breathable base is essential. Using a non-breathable system on a building like this risks trapping moisture within the wall structure, which can lead to problems such as spalling brick, rising damp, and internal moisture issues further down the line. Lime render is also slightly flexible, which is important. Buildings move, not dramatically, but enough that a rigid render can develop hairline cracks over time. Lime accommodates natural movement far better than cement-based alternatives, making it a smarter long-term choice for older properties and solid-brick construction. Because we applied the lime render base ourselves, we could ensure the preparation was done correctly from the outset, giving the CorkSol top coat the best possible surface to bond to. Why CorkSol SprayCork as the Finish? CorkSol is widely considered the most breathable exterior wall coating on the market. It’s made from natural cork (a renewable, sustainable material) and is applied as a spray, giving an even, textured finish that looks distinctive and weathers beautifully. For this project, we used the colour Frost, a clean, light tone that immediately modernised the appearance of the bungalow and gave it a fresh, crisp look. From a thermal insulation perspective, cork is an excellent performer. According to CorkSol’s own independent testing (carried out to the ISO 9867 standard), SprayCork has been shown to reduce heat loss through a wall by over 30%. CorkSol also state that their product is up to eight times more insulating than traditional lime or sand render alone. For the homeowner in New Milton, that kind of performance translated into a genuinely warmer home, with less reliance on heating during the colder months. [1] Beyond insulation, CorkSol also offers: Natural breathability - moisture can still escape the wall, preventing damp and condensation issues Crack resistance - the flexible nature of cork means it moves with the building rather than splitting Mould resistance - the coating creates an environment where mould struggles to establish itself Weather resistance - it forms a robust barrier against driving rain, wind, and the kind of damp Hampshire winters this property regularly faces Low maintenance - the surface can be cleaned with a domestic water jet, so there’s no specialist upkeep required Eco-friendly credentials - cork is a natural, renewable material with a low environmental impact Spray cork over lime render is a particularly effective pairing because both materials work on the same principle: they let the wall breathe. You get the structural protection and adhesion of lime render as the foundation, and the insulating, weatherproof, and aesthetic qualities of CorkSol on top. It’s a system that genuinely addresses all of the homeowner’s concerns in one go. 4. The Renovation Process. The project ran over two weeks from start to finish, with our team working methodically around the full exterior of the bungalow. Here’s how it came together: Step 1: Surface Preparation Before any render goes on, the surface has to be right. We cleaned down the exterior brickwork thoroughly to remove any dirt, biological growth, and loose material from the joints. Any areas of brick that were structurally compromised were assessed and treated accordingly. Good preparation is the single most important factor in determining how long a rendered finish will last, so this stage is never rushed. Step 2: Lime Render Base Coat Application With the surface prepared, we applied the lime render base coat across all elevations of the property. The lime render was worked evenly to create a consistent, well-keyed surface that would accept the CorkSol spray without any issues. Lime render needs time to cure properly before a top coat goes on, so this stage requires patience. Rushing it risks adhesion problems down the line, which is why two weeks was the right timeframe for this project rather than trying to compress everything into a few days. Step 3: Application of CorkSol SprayCork in Frost Once the lime render base had cured sufficiently, we moved on to the CorkSol application. SprayCork is applied using specialist spray equipment, which allows for an even, consistent coverage across the full exterior. The Frost colour was chosen by the homeowner for its light, contemporary feel. It complemented the dark grey window frames and roofline beautifully, giving the property a clean, modern look while keeping it sympathetic to the surrounding neighbourhood. The spray process also meant that even the harder-to-reach areas and awkward corners were covered consistently, without the risk of uneven application you can sometimes get with hand-applied finishes. Step 4: Finishing Touches and Inspection With the cork coating applied, we carried out a thorough inspection of all elevations to ensure the finish was consistent, the edges were neat, and everything was exactly as it should be. The black plinth detail at the base of the walls was applied to give the property that sharp, finished edge that separates a good result from a great one. The site was left clean and tidy, which is something we take seriously. When the work is done, the only thing the homeowner should be looking at is the transformation. Lime Render and Spray Cork in New Milton Project. Summary. This exterior rendering in the New Milton, Hampshire project is a really good example of what the right rendering system can do for a property. What started as a frustration with ongoing brick maintenance became an opportunity to genuinely upgrade the home; its appearance, its thermal performance, and its long-term resilience. The combination of lime render and CorkSol spray cork is one we recommend with confidence for brick properties, particularly older builds where breathability matters. It’s a system that works with the building rather than against it, and the thermal insulation benefits are real and measurable. Here’s a quick recap of what was achieved: Brick pointing has been eliminated permanently, no more ongoing maintenance costs Thermal insulation significantly improved throughout the exterior walls A fully breathable system installed from base coat to top coat A fresh, modern Frost-coloured finish that transformed the kerb appeal Crack-resistant and mould-resistant coating that requires very little upkeep Completed on time within the two-week project window If your home is a brick property and you’re tired of the same maintenance cycle, or if you’re simply looking to improve how your home looks and feels, exterior rendering with lime render and spray cork is well worth considering. It’s not a quick fix; it’s a proper, long-lasting upgrade. At Veramut Ltd, we offer exterior rendering services across New Milton, the New Forest, and throughout Hampshire and Dorset. If you’d like to talk through your property and find out what system might work best for you, get in touch with the team for a free, no-obligation quote. Trusted sources: [1] CorksSol Project Gallery
- Exterior Walls & Roof Renovation in Bournemouth
1. Property Renovation in Bournemouth. Project Overview. At the beginning of 2026, we undertook a comprehensive exterior property renovation in Bournemouth. The project involved roof painting and wall render renovation, using a high-performance, flexible cork render system. The homeowners chose a contemporary Pearl finish, aiming to modernise the property’s aesthetic while significantly improving its thermal and protective properties over a three-week period. The property required a high-performance, wall and roof renovation solution that could deliver lasting protection against the coastal climate while significantly improving kerb appeal. Spray cork render system was selected as the ideal product for the walls and Ceresit nanotechnology paint for the roof. Duration: 3 weeks Completion year: 2026 Materials: spray cork thermal render in Pearl colour and fiber-recinforced skim coat for the walls; Ceresit Nanotechnology silicone based paint for the roof Client goals: a long-lasting in the coastal climate, low maintenance, felxible and more thermally efficient exterior. Flexible Wall Render & Roof Renovation in Bournemouth. Case Study Outline: Project Overview. The Challenge. The Solution. The Renovation Process. Summary. 2. The Challenge. The existing exterior walls showed signs of cracking, weathering, and moisture ingress, typical of coastal properties exposed to salt air and driving rain. The client needed a render system capable of bridging hairline cracks and accommodating natural building movement, making standard rigid renders unsuitable. The finish needed to be visually appealing, providing a clean, modern appearance that would stand up to weathering over time. A standard cement render would not have adequately addressed the combination of flexibility, breathability, and aesthetic requirements. A specialist solution was needed. 3. The Solution. After assessing the property, we specified CorkSol spray cork render. An innovative, flexible render system made from natural cork granules. Its unique composition makes it one of the most effective eco-friendly property render solutions available on the market today. CorkSol was chosen for several key reasons: Flexible render properties: cork's natural elasticity allows the render to flex with the building, preventing cracks from forming or reappearing. Breathable property render: the open-pore structure of cork allows moisture vapour to escape from the wall, preventing damp and condensation build-up. Eco-friendly credentials: CorkSol is a natural, sustainable product, making it a responsible choice for homeowners and the environment alike. Pearl colour finish: the selected Pearl shade provided a clean, contemporary aesthetic perfectly suited to the property's character and the surrounding area. 4. The Renovation Process. Surface Cleaning We began by removing old stone features, cleaning and leveling the substrate. Any loose render removed and we repaired the cracks. Skimming The, we applied a fiber-based skim coat to ensure the walls were perfectly smooth before rendering. Roof Restoration Using a cherry picker for safe access, the roof was professionally pressure washed, primed, and coated with Ceresit nanotechnology paint. Spray Application The final stage involved the spray application of the CorkSol render in Pearl. Using spray technology ensures a uniform, seamless finish that reaches every corner of the walls. Property Renovation Project in Bournemouth. Summary. The Bournemouth CorkSol project is a strong example of how spray cork flexible render and quality workmanship can transform a property. The Pearl finish has given the home a fresh, modern appearance, while the breathable property render system ensures the building is properly protected from moisture and the elements for years to come. The eco-friendly property renders credentials of CorkSol, also giving the homeowner confidence that they were investing in a sustainable, long-lasting solution. One that works with the building rather than against it. This project reinforces our belief that spray cork render is one of the best exterior renovation solutions available, particularly for properties in coastal and high-exposure locations. Are you ready to transform your property exterior? Whether your home needs a flexible render upgrade, improved weatherproofing, or a stunning new finish, we'd love to help. Our team specialises in CorkSol spray cork render systems, perfect for coastal environment needs. Get in touch today and request your FREE, no-obligation property renovation quote. Our friendly team is waiting to hear from you. Project Gallery
- External Wall Insulation & Rendering in Bournemouth
1. External Wall Insulation and Rendering - Project Overview. Every home tells a story, and sometimes, it’s time for a fresh chapter. For the homeowners in Bournemouth, Dorset, that chapter began with a vision of better energy efficiency and a more modern, clean exterior. Tired of the dated pebble dash and aware of rising energy costs, the client contacted us here at Veramut Ltd to revitalise the look and performance of their property. What followed was a three-week renovation involving advanced EPS insulation and a flexible, breathable Ice White spray cork render finish. As a result, the owners can now enjoy a warmer, smoother, more elegant home exterior that ticks all the boxes: aesthetic value, insulation performance, and long-term durability. This case study explores the external wall insulation and rendering project, detailing how we brought this transformation to life. Location: Bournemouth, Dorset Duration: 3 weeks Render Colour: Ice White Spray Cork Insulation Type: Expanded Polystyrene (EPS) Client Goal: Improve thermal insulation and replace outdated pebble dash with a smoother, more contemporary exterior finish. 2. The Challenge. This project wasn’t about a simple cosmetic facelift. The homeowner approached us with two clear priorities. First, they sought to enhance the thermal performance of their property to lower heating bills and improve year-round comfort. The property’s old pebble dash render aged and had also begun to compromise the thermal performance of the building. Second, they were eager to replace the old, uneven pebble dash finish with something cleaner, durable and more innovative. 3. The Solution. After an on-site assessment, we recommended a two-step approach: external wall insulation using EPS boards and a final finish using spray cork render. Why EPS? EPS, or Expanded Polystyrene, is one of the most effective and widely used materials for external wall insulation, and of course, for good reason. When it comes to improving a property's thermal envelope, EPS offers an excellent balance between performance, affordability, and ease of installation. This lightweight insulation board is composed of tiny beads of polystyrene that are fused together, creating a closed-cell structure that traps air and significantly reduces heat transfer. It offers a highly efficient thermal barrier that keeps warmth inside during the winter and helps maintain a cooler indoor environment in the summer. For this Bournemouth property, EPS was the ideal solution. It allowed us to create a seamless layer of insulation across the external walls without adding excessive weight or thickness to the structure. The boards can be easily cut and shaped on-site, which made it possible to accommodate the home’s bay windows and curved sections with precision. Another key advantage of EPS is its longevity. Once installed and protected by a robust render system (such as our spray cork finish), it can last for decades without losing its insulating properties. It’s also moisture-resistant, which means it won't degrade due to damp or water ingress, a common concern in older or poorly rendered homes. In terms of environmental impact, EPS insulation helps reduce overall energy consumption in the home, contributing to lower carbon emissions over time. While it’s a synthetic material, it’s also fully recyclable and widely reused in the construction and packaging industries. Why Spray Cork? Spray cork render is becoming more popular among homeowners looking for an alternative to traditional cement-based wall rendering solutions, and it’s easy to see why. This innovative material offers a unique combination of thermal insulation, weather resistance, aesthetic appeal, and, most importantly, flexibility and breathability. One of the key advantages of spray cork is its natural elasticity. Unlike rigid render systems that can crack over time due to structural movement or changes in temperature, cork has an inherent ability to expand and contract in response to the building's movements. This flexibility makes it ideal for the UK’s coastal variable climate, where fluctuations in temperature and humidity can put pressure on exterior surfaces. Whether it’s a hot summer day or a damp and wet autumn morning, spray cork adapts to the environment, minimising the risk of cracks and reducing the need for costly repairs down the line. Equally important is the spray cork’s breathability. A breathable render allows moisture vapour from inside the property to escape through the walls without letting water in from the outside. This "moisture balancing" ability is crucial in preventing condensation build-up and maintaining a healthy living environment, especially in older homes where solid walls can trap humidity. By allowing walls to "breathe", spray cork helps protect against dampness and mould, contributing to better indoor air quality and long-term structural integrity. 4. The Renovation Process. Surface Preparation We began by assessing the condition of the existing pebble dash and preparing the walls for EPS installation. EPS Insulation Installation Next came the application of EPS boards. These were securely fixed to the exterior walls. The installation had to be precise, with special attention paid to sealing around windows, doors, and other architectural details. This created a seamless insulation envelope that would eliminate cold bridging and draughts. Mesh and Base Coat Application Once the EPS was in place, we applied a reinforced mesh layer embedded in a flexible base coat. This step is vital for durability, preventing cracks and ensuring the render adheres properly for years to come. This layer also smoothed out any imperfections, allowing for a flat, even finish when the topcoat was applied. Spray Cork Render in Ice White Now came the exciting part, the application of the Ice White spray cork render. This stage transformed the property’s façade from a patchwork of insulation panels to a cohesive, smooth, and vibrant finish. As the spray cork dried and cured, it revealed its signature matte texture and soft white finish, a stark contrast to the dated, gritty pebble dash that came before it. Final Detailing and Cleanup To wrap things up, we thoroughly cleaned the site and the surrounding areas, leaving the home exterior immaculate and ready to enjoy. 5. External Wall Insulation and Rendering in Bournemouth. Summary. This Bournemouth renovation is a prime example of what’s possible with the right combination of insulation and innovative wall rendering solutions. At Veramut Ltd, we believe that property upgrades should go beyond the surface, and this project proves just that. By replacing outdated pebble dash with a breathable, flexible cork render and boosting energy performance with EPS insulation, we’ve helped our client achieve both comfort and curb appeal. The final transformation is impressive and proves the property with an eco-conscious, thermally efficient solution that will last for decades. If this Bournemouth external wall rendering and insulation has sparked your interest, why not explore how we can do the same for your property? At Veramut Ltd, we offer expert wall rendering and insulation services tailored to your home’s unique needs. Whether you’re looking to modernise your home’s appearance, lower your energy bills, or simply invest in your property’s long-term value, our team is here to help. Get in touch with us today for a free consultation and personalised quote. Project Gallery
- Coloured Rendering in Bournemouth
1. Coloured Rendering Transformation in Bournemouth - Project Overview. Wind, rain, and salt air all contribute to the slow deterioration of coastal property exteriors. Over time, even the most charming home can start to look worn and weary. But what if you could completely transform your home’s appearance and protect it from coastal weather at the same time? That’s exactly what we achieved with this stunning home in Dorset. At Veramut Ltd, we specialise in coloured rendering, a modern solution that offers high performance, curb appeal, and longevity. Today we are going back to spring 2023, when we brought this Bournemouth property to life using peach-toned silicone spray render, delivering a sleek, breathable finish built to last. Here’s how we made it happen. Location: Bournemouth, Dorset Project Overview. Silicone spray render, peach tone (1 layer) Duration: 2 weeks Client Goals: remove deteriorated, cracked pebble dash render, improve the building’s aesthetic with a modern, smooth finish, and increase resistance to damp and weather exposure common in coastal homes. The project shows how coloured rendering can do more than refresh a building’s look. It can improve performance and reduce maintenance needs, all in just a few weeks. 2. The Challenge. The homeowners had lived with the original pebble dash exterior for many years. But over time, it had developed cracks, faded patches, and uneven textures. These defects weren’t just cosmetic. Cracked render allows water to seep in, raising the risk of internal damp, a real issue for properties located near the sea, where moisture levels are consistently high. Our clients wanted a long-lasting solution that looked smart and contemporary without compromising on durability. It needed to be easy to maintain, flexible enough to withstand building movement, improve damp protection, and ideally resistant to future cracking or staining. 3. The Solution. After a detailed site assessment, we recommended a silicone-based coloured rendering system, finished in a soft peach hue to suit the home’s character. Silicone render is one of the most advanced and practical options available today, especially for buildings exposed to coastal climates. It is breathable, water-repellent, and resistant to algae and dirt. It allows moisture to escape from inside the structure while repelling water from the outside. That means reduced risk of damp, fewer maintenance concerns, and a consistently clean finish for years to come. Choosing a peach tone gave the home a warm, inviting look, reflecting light beautifully without being overpowering. The finish is bright, modern, and highly durable. Exterior renovation that the homeowner had hoped for. 4. The Renovation Process. At Veramut Ltd, we take pride in delivering rendering services that are both thorough and refined. This Bournemouth project followed a four-step transformation process, combining precision with long-term performance. Surface Prep We started with cleaning the entire facade. We removed dirt, moss, and any remnants of the old finish. This step is always the first and essential for creating the best possible surface for render adhesion. It also gave us the chance to evaluate the condition of the walls. Removing the Cracked Pebble Dash We then carefully stripped the existing pebble dash render, which had cracked and weathered significantly over the years. Fibreglass-Reinforced Base Coat Application To prepare the surface for final rendering, we applied a fibreglass mesh-reinforced base coat. This added layer provides strength and flexibility, reducing the risk of future cracking caused by minor structural movements or shifting temperatures. It also acts as a secure bonding surface for the topcoat. Silicone Coloured Render Application Finally, we applied one consistent layer of silicone coloured rendering using a spray system. This ensured a smooth, even finish with excellent texture consistency. The spray technique also allowed us to work efficiently, covering the entire facade evenly while keeping disruption to a minimum. This peach-toned finish now forms a breathable, weather-resistant barrier around the property, protecting it from Bournemouth’s coastal elements while looking fantastic from every angle. Looking at the before and after images, the transformation speaks for itself. Before, the property looked tired and dull, with a mismatched colour scheme, red boundary wall, and stained pebble dash. Visible cracks made the facade appear neglected and outdated. After the home is now polished and professional, with smooth walls coated in a soft, peach coloured render, the lower wall has been integrated seamlessly into the new finish, and the overall look is one of clean modernity. 5. Coloured Rendering Transformation in Bournemouth. Summary. This Bournemouth project demonstrates exactly why coloured rendering is gaining popularity among homeowners looking to future-proof their properties. The combination of a silicone-based render system, fibreglass mesh reinforcement, and professional spray application resulted in a facade that’s durable, low maintenance, weatherproof, visually appealing, breathable and flexible. In just two weeks, we were able to strip away years of wear and give the home a brand-new lease on life, with protection that will last for decades. Are You Considering Coloured Rendering for Your Home? Let’s Talk. Have we inspired you by this transformation?Your property could be next. At Veramut Ltd, we specialise in coloured rendering solutions that are tailored to the demands of coastal and inland properties alike. From cracked pebble dash to dull paintwork, we can turn tired exteriors into stylish, breathable, and weatherproof facades. Get in touch today for a free consultation and quote.Let’s explore how coloured rendering can transform your property just like it did for this family in Bournemouth. See More Property Transformations Check out our other finished projects and imagine what we can do for your home. Project Gallery
- Thermal Property Upgrade in Weymouth
1. Thermal Property Upgrade in Weymouth - Project Overview. Located on a hillside in coastal Weymouth, this detached home had long battled the environmental pressures common to marine-front properties: high humidity, salt-laden winds, and seasonal temperature fluctuations. Its previous plastic cladding offered little resistance to these elements and performed poorly in terms of insulation, leading to higher energy bills and frequent maintenance demands. The homeowners approached Veramut Ltd with a clear objective: thermal property upgrade with an aesthetically modern finish in mind. Location: Weymouth, Dorset Colours:Spray Cork Render in Arctic White; Silicone Spray Paint for the roof in Anthracite Duration: 3 weeks Client goals:thermal property upgrade 2. The Challenge. Coastal homes are exposed to various environmental stressors. In this case, the property was clad in dated plastic panelling. While initially cost-effective, plastic cladding presents several long-term challenges: Poor thermal insulation, leading to heat loss in winter and overheating in summer. Susceptibility to UV damage and salt corrosion. Aesthetic degradation over time, including warping and discolouration. Moreover, the property’s roof had become weather-worn. Discolouration, accumulation of moss, and cracked tiles compromised its function and appearance. These issues led to heat escaping not only through the walls, but also through the roof, a critical contributor to overall energy inefficiency. The homeowners wanted more than just a cosmetic fix; they sought a genuine thermal property renovation to reduce energy usage, minimise ongoing maintenance, and enhance the value of their investment. 3. The Solution. After assessing the issues and the overall condition of the existing exterior and roof, we proposed a modern and sustainable strategy that aligned with the homeowners' goals and the climate challenges of coastal Dorset. The chosen materials offered transformative benefits: Spray Cork Render - The Thermal House Upgrade Essential for the Walls Spray cork is a revolutionary material made from natural cork granules blended with resins and natural additives. It adheres to virtually any surface and forms a flexible, breathable membrane that improves thermal insulation (retains warmth in winter and repels heat in summer). It is naturally resistant to salt, algae, UV rays, and cracking. It is also worth mentioning that spray cork render acts as an acoustic insulator, reducing exterior noise. This sustainable and eco-friendly product reduces environmental impact and comes in a range of colours (in this case, Arctic White was selected for a clean, modern finish). Roof Renovation with Silicone Spray Paint To complement the upgraded façade, we renovated the roof using silicone-based spray paint in Anthracite, a stylish and resilient solution. The owners opted for silicone coating for a few reasons: UV and water resistance, ideal for coastal and rainy climates. Elasticity that bridges hairline cracks and prevents future tile damage. Uniform, clean look that revitalises aged roofing materials. Together, these choices delivered a complete thermal property upgrade, improved curb appeal, and long-term cost efficiency. 4. The Renovation Process. 4.1. Site Assessment and Material Planning. Before initiating work, Veramut carried out a detailed assessment of the property, examining structural integrity, insulation deficits, and surface condition. A thermal imaging scan helped pinpoint where most heat loss occurred, confirming the need for both wall and roof treatment. 4.2. Cladding Removal and Wall Preparation. The outdated plastic cladding was carefully removed to reveal the original structure. This step exposed minor imperfections and thermal bridging points, which were corrected using a base coat. The base coat served to even out the substrate and provide a firm bonding surface for the cork material. Once set, a primer was applied to ensure the cork’s adhesion and effectiveness. 4.3. Application of Spray Cork Rendering. The walls were coated with two layers of spray cork, applied with specialised equipment for uniform coverage and texture. Arctic White was chosen to enhance natural light reflection and offer a clean contrast with the roof and landscaping. Note: The number of spray cork layers applied always depends on the expected thermal effect. For properties requiring enhanced insulation or exposed to severe climates, additional layers may be advised to optimise performance. As the cork dried, it formed a seamless, weather-resistant barrier that significantly improved the property's thermal envelope. The result was a breathable yet airtight finish that offered exceptional energy performance. 4.4. Roof Restoration. After years of exposure to harsh coastal weather, the roof required a comprehensive restoration to bring it back to optimal condition. The process began with an intensive cleaning phase. Using industrial-grade pressure washers, the team carefully removed years of accumulated moss, algae, dirt, and salt deposits. This step was crucial not just for appearance, but to ensure proper adhesion of the subsequent coatings and to reveal any underlying structural issues that might otherwise go unnoticed. Once we cleaned the roof, we conducted a detailed inspection to identify damaged tiles. As a result, we found several split and worn tiles across various sections of the roof. We carefully removed these and replaced them with high-quality matching tiles to restore the roof’s continuity and ensure its watertight integrity. With the surface prepped and stabilised, we applied a primer across the entire roof. After allowing the primer to cure properly, we applied two even coats of silicone-based spray paint in Anthracite.The choice of Anthracite was intentional; not only does it add a sleek, modern finish that complements the Arctic White cork-rendered walls, but it also helps reduce glare and maintains its depth of colour under sunlight. The silicone coating itself brought a host of performance benefits. Known for its good elasticity, it effectively bridged over fine hairline cracks and created a continuous, weatherproof barrier. Its high resistance to UV rays and water penetration makes it an ideal solution for coastal environments where roof surfaces are constantly subjected to fluctuating temperatures, sea spray, and wind-blown salt particle. 5. Summary. This thermal property upgrade project in Weymouth proves our commitment to innovation, sustainability, and customer-focused solutions. By combining modern materials with skilled workmanship, our team delivered an impressive transformation that ticked every box: energy efficiency, visual appeal, and weather resilience. The home, once outdated and inefficient, has been transformed into a stylish, energy-conscious solution ideally suited to its coastal environment. Transform Your Home with a Thermal Property Renovation If you're dealing with outdated cladding, a tired roof, or want to make your home more energy-efficient, Veramut Ltd is here to help. Our expert team specialises in spray cork rendering and advanced roof restoration solutions designed for coastal properties like yours. Don't wait to improve your home's comfort, appearance, and insulation performance. Contact us today for a free, no-obligation quote. Project Gallery
- Spray Cork Rendering in Rockbourne
1. Spray Cork Rendering for Thermal Insulation & Brick Protection - Project Overview. If you’ve been considering improving your home’s energy efficiency and protecting its exterior, this case study is worth a read. Two months ago, we completed a spray cork insulation project in Rockbourne, Hampshire, that enhanced the thermal insulation and gave the home a new look. Are you curious to see how we achieved this transformation with spray cork rendering in just two weeks? Keep reading to find out how we tackled the challenges, delivered the perfect solution, and left the homeowners thrilled with the results. Location: Rockbourne, Hampshire, UK Client: Private homeowner Project Duration: 2 weeks Materials Used: CorkSol in Sage colour This year, in October, we undertook an exciting two-week project in the charming village of Rockbourne, Hampshire. The property, a classic brick home, was in need of both functional and aesthetic improvements. The owner's main goal was to address two key concerns: improving thermal insulation and protecting the brickwork from weather damage. By the end of the project, not only had the property been transformed visually, but it was also better equipped to handle the elements, delivering improved energy efficiency and enhanced durability for years to come. Spray Cork Rendering for Thermal Insulation & Brick Protection. Case Study Outline:Project Overview. The Challenge. The Solution The Renovation Process. Summary. 2. The Challenge. Every property comes with its own set of challenges, and this one was no exception. First, thermal inefficiency was the owners' primary concern. The property was losing heat through its walls, especially during the colder months. With winter approaching, it was clear that something needed to be done to improve the property’s insulation so the family could stay warm without constantly cranking up the heating. The next issue that needed addressing was the vulnerability of the brickwork. Over the years, the brick had started to show signs of wear and tear. Weathering from rain, wind, and fluctuating temperatures had left it looking tired, and worse, it was becoming more susceptible to moisture damage. Without action, this could lead to structural issues down the road—something we definitely wanted to prevent. 3. The Solution. After evaluating the challenges, we knew we needed a solution that would tick all the boxes: practical, durable, and visually appealing. That’s when we recommended coloured spray cork insulation—a material that’s quickly gaining popularity for its perfect blend of style and functionality. Known for its unique combination of practicality and style, spray cork provided: Thermal insulation As property insulation, in this case, was one of the primary goals, spray cork delivered exactly what we needed. Thanks to its natural insulating properties, it significantly reduces heat loss, keeping the warmth inside the home and the cold out. Not only does this improve comfort, but it also helps make the property more energy-efficient, meaning the homeowners would see a reduction in energy bills, especially during the colder months. Weatherproofing When it comes to weather protection, spray cork works wonders. It creates a breathable barrier that’s both waterproof and moisture-resistant. The render prevents rainwater and moisture from seeping into the brickwork, but it also allows the structure to breathe, which helps avoid issues like damp or mould build-up inside the walls. This is essential for preserving the longevity of the home’s structure, especially in the unpredictable British weather. Environment-friendly An added bonus of choosing spray cork coating is that it’s an eco-friendly option. Made from natural materials, it aligns perfectly with the homeowner’s desire for a sustainable solution. Not only does it provide a high level of protection and insulation, but it also minimizes the environmental impact compared to more traditional rendering materials. It was the perfect choice for those who wanted to make their home more energy-efficient while staying mindful of their carbon footprint. Aesthetics On top of all these practical benefits, the Sage-coloured finish added a modern, fresh look to the home. It wasn’t just about functionality—it was also about enhancing the property’s appearance. The soft, natural tone of the Sage colour complemented the surrounding landscape beautifully, giving the home a sophisticated and stylish upgrade. The homeowners were thrilled with how the finish brought a contemporary feel while still blending in perfectly with its environment. 4. The Renovation Process. Every step of the process was approached with meticulous care to ensure the best possible results for the homeowner. Step 1 Brick PreparationTo start with, we began by thoroughly cleaning the existing brickwork. We removed dirt and grime and filled existing cracks. This created a strong and smooth base for the spray cork application. To prevent any accidental overspray, we covered the adjacent areas. Step 2 Application of Spray Cork InsulationWe applied the cork in two layers using professional-grade equipment to ensure an even and durable finish. Step 3 Finishing TouchesOnce the render had cured, as always, we checked the rendering outcome to ensure consistency and high-quality results. Step 4 Clean-UpIn the end, we removed all equipment and protective coverings to make sure we left nothing but a beautifully finished home. Throughout the process, the team communicated with the homeowners, keeping them updated and ensuring they were thrilled with each stage of the work. 5. Spray Cork Rendering for Thermal Insulation & Brick Protection - Summary. This property spray cork insulation project in Rockbourne is an excellent example of how rendering can elevate a home functionally and visually. In just two weeks, we transformed its look, ensuring it’s better protected from the elements and a standout feature in the neighbourhood. The completed project exceeded expectations in every way. The Sage-coloured spray cork added a stunning, modern look to the home while effectively addressing the property’s functional challenges. The homeowners now enjoy: Improved thermal efficiency. Peace of mind knowing their home is protected from the elements. A home exterior that stands out for its beauty and practicality. The homeowner shared this glowing feedback after the project: "A very professional, hard-working company and staff, who take pride in their work. They provide a very good product, and I have no trouble in recommending them." Spray Cork Insulation in Dorset and Hampshire. Request a Free, No-Obligation Quote Today. If you’re inspired by the results above and want to transform your property with spray cork insulation, don’t hesitate to get in touch. Contact us today for a free, no-obligation quote and discuss how we can enhance your home’s energy efficiency, protection, and curb appeal. We’re here to help. Project Gallery